In this part 2 of Creating A Custom Joomla Template, we're going to add a logo and a navigation bar (menu bar).
IMPORTANT: This tutorial assumes that you are coming from PART 1 and that you have a 'clean' install of Joomla! with no sample data added (How To Install Joomla In WAMP Server).
You can find PART 1 of this tutorial here:
STEP 1: Add A Logo
What's a website without a logo, so that's the first thing we'll do:
- Create a logo for your website.
- It should be 350x70 pixels (WxH).
- If you want to use the generic one a created for this tutorial (shown below), click here to download it: Logo.

- Name the image "logo". The image extension can be a
.pngor a.jpgimage extension. - Place the logo in here: /templates/mytemplate/images (where
mytemplateis the name ofyour template). - Add the logo image to the header section of your template's
index.phppage. Here's the image element code:<img class="logo-image" src="/templates/mytemplate/images/logo.png" />.- Change the
mytemplateto the name of your template. - If your logo image has a
.jpgextension, then make sure the code snippet you add to your template reflects that.
In your template's index.php file, this:
Should now look like this:
<!-- start header -->
  <div class="header">
    <img class="logo-image" src="/templates/mytemplate/images/logo.png" />
  </div>
<!-- end header -->
Notice that the the image element has the class name of logo-image. This will help us style the logo in PART 3 of this tutorial.
STEP 2: Add The Navigation Bar
In your template's index.php file, you'll find the following line of code <jdoc:include type="modules" name="navigation" />.
This is the position where the navigation bar will appear in your site's web pages.
To get the navigation bar to appear in that position, you need to set the Main Menu module's position to the navigation position in your website's administrator's control panel.
Let's do that now:

- Log in to your administrator's control panel (if you haven't already).
- Go to Extensions->Modules.
- The
Modules (Site)panel will now load.

On the Modules (Site) panel, you'll notice 3 selections:

- Click on the
Main Menuoption (click on the name itself). - The
Main MenuModules: Menupanel will now load.

- On the right side of the panel, you'll see a parameter with the name of
Position.

- Click on the
xnext to theposition-7name. - The
position-7name will be removed. - Click on the down arrow. You'll now see a drop-down list of positions from all of the installed templates in your Joomla! website.

- Scroll down the list till you come to the
mytemplateheading (wheremytemplateis the name of your template). - Select the
Navigation [navigation]option. - Click the
Save & Closebutton at the top of theMain Menumodule panel (see image below).

You have now added the Main Menu module (which is the navigation bar) to your website's pages.
STEP 3: Add Menu Items To Main Menu (Navigation Bar)
We're now gonna' add menu items to the Main Menu.
For this tutorial, I'm going to have you add 2 menu items. One will be named Cars and the other will be named Bicycles.
Bear with me and name your menu items the same names. Once you learn how to create a menu item, you can go back and change the names.

- Go to Menus->Main Menu.
- The
Menus: Items (Main Menu)panel will now load.

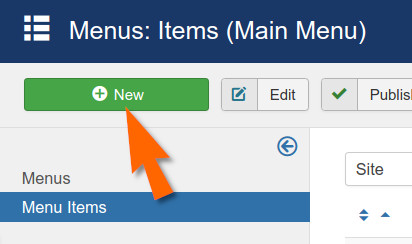
- Click on the green
Newbutton (in the tool bar). - The
Menus: New Itempanel will now load.

In the Menus: New Item panel, configure the following:
Menu title *- typeCarsin the text box.Alias *- typecarsin the text box.Menu item type *- click on the blueSelectbutton (see image below).

- The
Menu Item Typemodal window will now open.

In the Menu Item Type modal window:
- Click on the
Articlesoption. - The
Articlesaccordion will now open. - Click on the
Category blogoption. - The modal window will now close.

On the Choose a Category * option, you'll now notice that a Create button has been added.
- Click on the
Createbutton. - The
New Categorymodal window will now open.

In the New Category modal window, add the following:
Title *- typeCarsin the text box.Alias- typecarsin the text box.- Click the blue
Save & Closebutton. - You'll now be returned to the
BicycleMenus: Edit Itempanel.

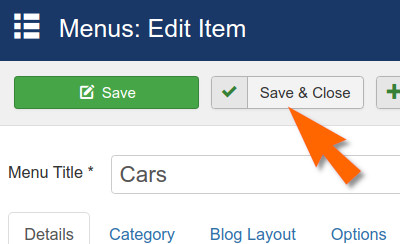
- Click on the
Save & Closebutton at the top of the panel (see image above). - You'll now be returned to the
Menus: Items (Main Menu)panel.
STEP 4: Add A Second Menu Item
We're now gonna' add a second menu item. Instead of creating one from scratch, we're going to copy the existing Cars menu item.
These are the steps:

- In the
Menus: Items (Main Menu)panel (Menus->Main Menu). - Click on the
Carsmenu item name (see image above). - The
CarsMenus: Edit Itempanel will now load.

In the Cars Menus: Edit Item panel:

- Click the
Save as Copybutton. - The panel will reload and you'll notice that the
Menu Title *and theAliasname have a number 2 added.

- Rename the
Menu Title *from:Cars (2)to:Bicycles. - Rename the
Aliasfrom:cars-2to:bicycles. - On the
Choose a Category *option, click on theX Clearbutton.

You'll now see that the Choose a Category * parameter will revert to its default options:

- Click on the
Createbutton. - The
New Categorymodal window will now open.

In the New Category modal window, add the following:
Title *- typeBicyclesin the text box.Alias- typebicyclesin the text box.- Click the blue
Save & Closebutton at the bottom of the modal window. - You'll now be returned to the new
BicyclesMenus: Edit Itempanel.

In the Bicycles Menus: Edit Item panel, find the Status parameter (it's on the right side of the panel):

- Click on the red
Unpublishedselection. - You'll now see a drop-down list appear (see image below).

- Click on the
Publishedoption of the list. - The
Statusparameter will now be set to a greenPublishedstate.

- Go to the top of the panel and click on the
Save & Closebutton.
Check The Front Page
If all went according to plan, go to the front page of your Joomla! website and you should see the following page:

Not much to look at, but it's getting there!
